torsdag den 30. september 2010

NXT Programming lesson 4

Lesson 4 description 

Date: 23 september 2010

Duration of activity: 13.15 - 18.00
Group members participating: Nikki & Knud

GOALS for lesson 4
-In this lab session we will try to make a self-balancing LEGO robot inspired by Steve Hassenplug's origional Legway controlled by the RCX, [1]. Two examples of self-balancing robots controlled by the NXT is Philippe Hurbain's NXTway, [2], and Brian Bagnall's balancing robot, [3]. Use these as inspirations to build and program your own robot.

Subgoals:
  1. Build the robot
  2. Create balancing algorithm and get the robot to balance
Plan for achieving the goals
1. Build the robot
Follow the building instructions on http://www.philohome.com/nxtway/bi_nxtway.htm

2. Create balancing algorithm and get the robot to balance
We will use a PID-controller as basis for the balancing algorithm and use the supplied references as inspiration. We will also try to avoid the motorblock by making the balancing smooth by tweaking the coefficients Kp, Ki and Kd. If time allows it, we will implement live tuning over bluetooth (http://en.wikipedia.org/wiki/PID_controller#Manual_tuning). If we are not able to achieve a smooth balancing, we will trade the motorblock for imprecision in the actuators by plugging the actuators into socket A and C (uses two different H-bridges, thus avoiding the motorblock)
The balance test will be done on non reflecting surface and in a relative dark room so the ambient light doesnt influence on the sensor.
A test could also be done with the robot connected to charger connected to the power grid to insure that theres full charge on the motor so it has enough power to reactly.
Instead of the light sensor, perhaps the sonic sound sensor used previously to measure distance could be used.

Results
1. Build the robot
The Robot build after following the previously mentioned guide:
A small modification that we made to change the mass middle point to reduce oscillation:


2. Create balancing algorithm and get the robot to balance
We decided to write our own PID regulator in java to better insure that we understand it.
Proportional Part:
Its a coefficient that's multiplied of the current error, Kp * error so we now have a value that proportional to the error, so the P part adjust the control signal proportion to the error, if the error is big then we have make a big change to control signal u which is the output of regulator and in our case the input to the motors or the power to motors.
Integration Part:
We found that it can be approximated with the Trapezoidal rule (http://en.wikipedia.org/wiki/Trapezoidal_rule) with the following formula:

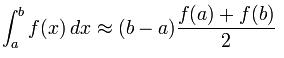
however we can just write f(a) + f(b) since the timedifference (b-a)*(1/2) will just be constant and therefore a part of a constant or coefficient, the Ki that can be tweaked. In other words we can just add the current error with previous error, error + preverror.
The integration part changes the control signal u according to error of the last time or the previous error, example if the error is zero and we are spot on then there wont be added anything to it this is useful for finding the right steady state level of the desired signal.
Differentiation Part:
The differentiator part concerns the slope of the error or the rate of change of the error. That can be found with:

again we just write f(x+h)-f(x) since (1/h) is constant and can be tweaked with Ki coefficient.
However we don't know the future value of the error so we have to be a step behind and instead write the current error subtracted with the previous one. Error - Preverror.

Datalogging & Mapping:
We had an idea to make real time monitoring of the Position and power with datalogging and plot it, for it to look like the graphs on page 187 and 189 in the printout delievered from “Robotic Exploration A Hands-On Introduction to Engineering” from Fred G. Martin so we would be able to see visually how well the respective terms in the PID regulator are performing and tweak the PID coefficients accordingly.

Our implementation of the PID-controller:
static void pidControl(int desiredLight) throws Exception {
// PID values
final float Kp = 4f;
final float Ki = 0f;
final float Kd = 1.83f;

DataLogger dl = new DataLogger("Sample.txt");
int scalaPlus = (1024 - desiredLight);
int scalaMinus = desiredLight;

_ls.setFloodlight(true);

int light, power;

float error, prev_error, Pout, Iout, Dout;
error = prev_error = Pout = Iout = Dout = 0;

LCD.drawString("Light: ", 0, 1);
LCD.drawString("Desired light: ", 0, 2);
LCD.drawString("Error:    ", 0, 3);
LCD.drawString("Power:    ", 0, 4);

while (! Button.ESCAPE.isPressed())
{   
light = _ls.getNormalizedLightValue();

error = light - desiredLight;

// Proportional term
Pout = Kp*error;

// Integral term
Iout = Ki* ( (prev_error + error)/2 );

// Derivative term
Dout = Kd * (error - prev_error);

prev_error = error;

power = Math.round(Pout + Iout + Dout);

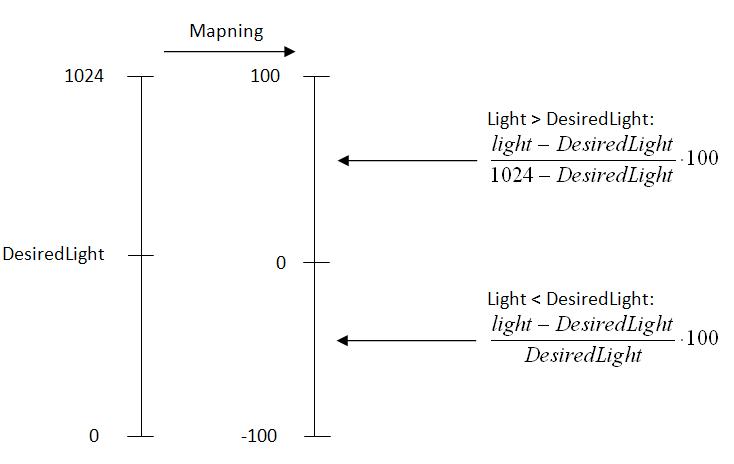
// Sample light on -100 0 100 scale
if(light>desiredLight) {
dl.writeSample(power, ((light-desiredLight)/scalaPlus) * 100);
} else {
dl.writeSample(power, ((light-desiredLight)/scalaMinus) * 100 );
}

if ( error > 0 )
{
power = Math.min(power,100);
Car.forward(power,power);
LCD.drawString("Forward ", 0, 5);
}
else if (error < power =" Math.min(Math.abs(power),100);">


One of the problems we encountered when running the code in practice on the robot, is that when the robot would tilt backwards it would not back fast enough on the wheels to corrigate for the tilt and would therefore tilt backwards completely. 

http://www.liscom.dk/lego/Lab4Balance/Lab4Balance.java 
http://www.liscom.dk/lego/Lab4Balance/BlackWhiteSensor.java 
http://www.liscom.dk/lego/Lab4Balance/DataLogger.java 

torsdag den 16. september 2010

NXT Programming Lesson 3

Lesson 3 description 

Date: 16 september 2010

Duration of activity: 14.15 - 17.30
Group members participating: Nikki & Knud


GOALS for lesson 3
- To use the NXT sound sensor to turn the LEGO 9797 car into a sound controlled car

Subgoals:
1. Implement and test datalogger while also testing sound sensor
2. Test sound controlled car
3. Test Clap controlled car

Plan for achieving the goals
1.
We will use the datalogger code supplied. We will test the sound sensor by looking at the display while clapping in front of it. We will test the datalogger by importing the logged data into a graph.

2.
We will use the code supplied and test how it reacts on sounds, we will also implement the button listener, so we always can stop the program by hitting Escape

3.
We will use the code in nr. 2 again and modify it to detect claps.

Results
1.
We tested sound sensor and datalogger.
We had some problems importing the data logged by datalogger, because it was comma separated and inserting new line after a fixed number of samples. We removed the commas and made it insert a new line after each sample. This made it easy to import into a spreadsheet program supporting CSV formated data files.

We recorded 2 normal claps, a quick/light clap and a fist hammered down in the table.
The initial rise in sound is probably some calibration performed by the sound sensor, as this happens everytime.

As seen in the graph, its hard to discern the fist in the table from the claps based on only the amplitude and time over a certain threshold.
Test of sound sensor and datalogger


2.
The program defines a sound threshold value, which will trigger a new state when the sound reaches above that value.

As suggested, we used a button listener so the program can always be stopped by pressing escape. The code snippet is seen below.

Button.ESCAPE.addButtonListener( new ButtonListener() {
public void buttonPressed( Button button) {
Car.stop();
lejos.nxt.NXT.exit(0);
}
});


3.
This is our algorithm for clap detection, it is based on 3 states we therefore used switch case.

State 1 continues to state 2 when the amplitude is below 50
State 2 continues to state 3 when the amplitude is above 85 within 20 milliseconds (The lab lesson note says 25, but after some experimentation we found that 20 left out more no-clap sounds). It goes back to state 1 when 20 milliseconds has passed
State 3 checks if the amplitude falls below 50 within 250 milliseconds. When this happens we have a clap (or a very loud sound that is very short).

private static void waitForClap() {
int soundLevel;
long timeLastStage = 0;
int stage = 1;

boolean check = true;
while (check) {
soundLevel = sound.readValue();
LCD.drawInt(soundLevel,4,10,0);

switch (stage) {
//A clap is a pattern that starts with a low-amplitude sample
// (say below 50),
case 1:
if(soundLevel <>
timeLastStage = System.currentTimeMillis();
stage = 2;
}
break;
// followed by a very-high amplitude sample (say above 85)
// within 25 milliseconds,
case 2:
// Some tests showed that value 20 left out undesired detections
if((System.currentTimeMillis() - timeLastStage) <>
{
if(soundLevel > 85) { // could be a clap, go to next stage
timeLastStage = System.currentTimeMillis();
stage = 3;
}
}else { // 20milli passed, not a clap
stage = 1;
}

break;
// and then returns back to low (below 50)
// within another 250 milliseconds.
case 3:
if((System.currentTimeMillis() - timeLastStage) <= 250) {
if(soundLevel <>
// Clap!
Sound.beep();
check = false;
}
}else { // 250milli passed, not a clap
stage = 1;
}
break;
}
}
}
Source code:
http://www.liscom.dk/lego/Lab3ClapCtrCar/Lab3ClapCtrCar.java
http://www.liscom.dk/lego/Lab3ClapCtrCar/DataLogger.java
http://www.liscom.dk/lego/Lab3ClapCtrCar/SoundSampling.java


NXT Programming lesson 2

Lesson 2 description 

Date: 9 september 2010

Duration of activity: 14.15 - 18
Group members participating: Nikki & Knud


GOALS for lesson 2
- Investigate the ultrasonic sensor and use it to make a wall follower program

Subgoals:
1. Test of the Ultrasonic Sensor
2. Test of Tracker Beam
3. Test of Wall Follower

Plan for achieving the goals
1.
The sensor will be mounted on LEGO 9797 car, and then tested with SonicSensorTest.java
- We will then make a table with columns [type of object] [measured distance] [real distance].
- We will try with different sample intervals as well
- We will try to measure the theoretically maximum measuring distance which is 254 cm to see if the sensor actually can measure such a distance under any conditions
- We will consider the implications of how the speed of sound limit usage of the sensor

Theoretic consideration for the sensor and the sample time
S=V*t <=> t = S/V
S =2.54 m
V =340,62 m/sec
t = 7,46 ms
total time = 14.92 ms
This means that with the default sample time of 300ms we have around 285ms of doing nothing
The implications is that our sample time cannot be shorter than 14.92ms (plus some ms for the a/d conversion and sensor to calculate the distance), as the sensor is limited by the speed of sound. To overcome this limit, we could use a sensor based on radio wave reflections, thus we are limited by the amazing speed of light.

2.
To test the tracker beam we will try the Tracker.java program and describe the behaviour of the car controlled by the program and experiments with changing the different constants in the program. And also consider what type of control system it is when the power to the car motors is the controlled variable and the distance is the measured variable?
Link to code:

http://www.legolab.daimi.au.dk/DigitalControl.dir/NXT/Lesson2.dir/Tracker.java

http://www.legolab.daimi.au.dk/DigitalControl.dir/NXT/src/Car.java

3.
We will try to use Philippe Hurbains program to make the Lego 9797 follow a wall


Results
1.

ObjectReal distance cmMeasured distance cmNotes
Black trashcan3028
Black trashcan6058
Black trashcan150148
Black trashcan205199
Whiteboard sponge30255Cannot measure it because of the angle. The sponge is not high enough
Whiteboard sponge6064
Whiteboard sponge135140
Whiteboard sponge150255Object too small to be measured from that distance
Office chair 3032
Office chair9091
Office chair150255
Wallca. 254254

Lowering the sample interval isn't of interest here, its more of interest when having a moving robot that has to respond fast to different readings/obstacles.

2.
Tracker.java test program test:
From looking in the code its show that its measures the distance and calculates an error value from a predetermined distance. It drives either forward or backwards, determined by the error value. If the error is bigger than zero it drives forwards and if the error is less than zero it drives backwards. We confirmed this in practice.
The system responds to feedback so its a feedback control system. It multiplies the error with a gain value and uses this as power, thereby making it a P (proportional) closed loop regulator.


3.
Wall follower:
We converted Philippe Hurbains program to Java. We had some trouble calibrating the distance thresholds and angling the ultrasonic sensor correctly. It kept coming too close to the wall. In the end we succeeded, though it did not move smoothly..
The reason it did not move smoothly is because of abrupt turning.
It moves and turns by having 4 states for the right motor and 3 states for the left motor. The 4 states are:
  • Reverse motor (only the right motor)
  • Stop motor
  • Medium power to motor
  • Full power to motor

These states make it possible to drive forward and turn at 3 different speeds to the right and turn 2 different speeds to the left.


An alternative way to create the wall follower could have been to take the Tracker.java code and modify it so that not only drives forward and backward, but turns left or right according to the error. Since that code calculates the error more fluently and is a better estimate of making a closed loop P-regulator this could have resulted in less oscillating behaviour and more fluently turns. A PID-regulator would of course be even better.

Source code:
http://www.liscom.dk/lego/lab2Wallfollower/Lab2WallFollower.java

torsdag den 2. september 2010

NXT Programming lesson 1

Lesson 1 description 
Date: 2 september 2010
Duration of activity: 14.15 - 17
Group members participating: Nikki & Knud


GOALS for lesson 1
  1. To build LEGO Mindstorms Education NXT Base set 9797 lego car
  2. Installation of the Lejos Java system (lejos for eclipse + USB driver)
  3. Compile, upload and test Java control program LineFollower.java to make the car follow a black line on a white surface (http://www.legolab.daimi.au.dk/DigitalControl.dir/NXT/Lesson1.dir/LineFollower.java )
The process of achieving the goals:
1.
The NXT base 9797 lego car was built from the lego user manual. Our received lego set lacked alot of the blocks needed to built the car so we spent alot of extra time looking for those blocks.

2.
leJOS for eclipse was downloaded from http://lejos.sourceforge.net/nxj-downloads.php
and installed using the guide provided on lejos homepage
http://lejos.sourceforge.net/nxt/nxj/tutorial/Preliminaries/UsingEclipse.htm
it quickly clear that the NXJ plugin didnt work so the guide couldnt be followed step by step.

We googled and found various forum where it was obvious that a lot of people had problems with getting the plugin to work.

We tested if it was possible to compile a project (for example the hello world) in the command prompt. In order to do that the following to Path system environment variable
Path C:\programmer\leJOS NXJ\bin

In order to build ant and compile that way in eclipse the following system environment variables was added:
JAVA_HOME C:\programmer\Java\jdk1. 6. 0_21\
NXJ_HOME C:\programmer\leJOS NXJ

In eclipse the ant file of the respective project in question is build from right clicking on build.xml and selecting Run as -> ant build

For a long time there was problem with the linker, that was because we didnt reboot after setting the variables.

The usb driver (Fantom driver) was downloaded from
http://mindstorms.lego.com/en-us/support/files/Driver.aspx

3.
We carried out some tests

Test 1:
"Try to place the light sensor above different colors and make a table of light values corresponding to the different colors. Use the light percent values for black and white to explain how the threshold value could be obtained from a reading above black and white."

Results:

Yellow: 60
Red: 54
Blue: 36
Green: 49

black: 35
white: 57

Conclusion:
A reasonable threshold would be a middle value between the two values in question

Test 2:
"The light sensor is used with the red LED turned on light.setFloodlight(true). This means that the sensor measures the reflection of the red LED. Try to turn the LED off and notice the differens in measurements obtained by making a similar table of readings above different colors. With the LED turned off the ambient light level is measured. This is e.g. usefull in day/night detection."

Results:
green: 37
blue: 25
red: 28
yellow: 38

Conclusion:
The colors now them self doesnt give a huge spreading compared to before, its now more dependent from the ambient light. So shadowing the sensor changed the values even more.

Test 3:
"In the program a delay of 100 msec is used between light sensor readings. We call this the sample interval. Try with a sample interval of 10 msec, 500 msec and 1000 msec. Explain what happends."

Conclusion:
The robot becomes slower at responding, which results in bigger turns and slower "oscillation" frequency as the delay increases.

note template

Date:
Duration of activity:
Group members participating:


Furthermore, each activity should be described by:
  • a goal (or goals) for this activity, maybe with a list of subgoals,
  • a plan for the activity including a description of methods that lead to fulfillment of the goal(s),
  • results obtained including descriptions of
    • experiments together with a description that other groups can use to reproduce your experiments,
    • programming attemts with program segments and links to programs,
    • output from programs,
    • measurements,
    • pictures of LEGO models,
    • problems encountered.
  • a conclusion with a status and suggestions for what to do next.
  • references to papers, web pages or copied material.