mandag den 22. november 2010

NXT Programming lesson 10

Date: 18. November 2010
Duration of activity: 12 - 17
Group members participating: Nikki & Knud


GOALS for lesson 10:

Our goal is to explore the lejos behavior based architecture and try to improve it so a simple version of Thiemo Krink’s “Motivation Network” [Krink] can be implemented.


Plan for achieving the goals:

We will explore the lejos behaviour based architecture by following the lesson 10 lab description. We will try to improve the architecture as suggested in lesson 10.


Results:

Results from suggested experiments in lesson 10 lab description:


  • “Press the touch sensor and keep it pressed”
When this is done the robot just keeps doing the action of detectwall behavior because takecontrol of detect wall keeps being true and has the highest priority. That action is:
public void action()
{
Motor.A.rotate(-180, true);// start Motor.A rotating backward
Motor.C.rotate(-360);  // rotate C farther to make the turn
}
  • “Investigate the source code for the Arbitrator and figure out if takeControl of DriveForward is called when the triggering condition of DetectWall is true.”
takeControl of Drive Forward is not called by the Arbitrator, as DetectWall has higher priority. The Arbitrator calls the behaviours takeControl method in the highest priority order. When a takeControl method returns true, the Arbitrator stops calling further down the list of behaviours.


  • “Implement a third behavior, Exit. This behavior should react to the ESCAPE button and call System.Exit(0) if ESCAPE is pressed. Exit should be the highest priority behavior. Try to press ESCAPE both when DriveForward is active and when DetectWall is active. Is the Exit behavior activated immediately ? What if the parameter to Sound.pause(20) is changed to 2000 ? Explain.”
While DetectWall is active, pressing the escape button doesn't exit the program because of no implemented suppress method in DetectWall. Furthermore the takeControl of DetectWall has a delay of 20ms because the ultrasonic sensor being in ping mode so it has to have time for receive the echo. This delay will also contribute to the Escape button press not being detected. To solve these two problems, we removed the delay (and made the sonar ping continuously in the background) and implemented the suppress method in DetectWall (we made sure there was no blocking calls in the action method, ie. the rotate function of Motor.C was blocking).


  • “To avoid the pause in the takeControl method of DetectWall a local thread in DetectWall could be implemented that sample the ultrasonic sensor every 20 msec and stores the result in a variable distance accessible to takeControl. Try that. For some behaviors the triggering condition depends on sensors sampled with a constant sample interval. E.g. a behavior that remembers sensor readings e.g. to sum a running average. Therefore, it might be a good idea to have a local thread to do the continuous sampling.”
Avoiding the pause was fixed as described above by making the the ultrasonic sensor continuous. Essentially this runs the sampling in another thread, so no blocking occurs in the takeControl method.


  • Try to implement the behavior DetectWall so the actions taken also involve to move backwards for 1 sec before turning.
We implemented the behavior and made sure it could be suppressed.


  • Try to implement the behavior DetectWall so it can be interrupted and started again e.g. if the touch sensor is pressed again while turning.
The Arbitrator will not repeat the same behavior, because its priority is the same. We discussed this and came up with 3 solutions:
    1. Change the Arbitrator, so the same behaviour (same priority) can be suppressed and restarted.
Pros: Only a small change in the Arbitrator code is necessary.
Cons: We change how the architecture behave, this may affect other behaviours, not expecting to be suppressed by itself.


    1. Add the same behavior twice.
Pros: A small change in the main class.
Cons: It can only be interrupted once, unless it is added more than twice


    1. Divide the behavior the robot has to make, up in two behaviors. One behavior that backs up the robot and one behavior with 1 priority lower that turns the robot.
Pros: We don't change the architecture and it is not limited to one interruption.
Cons: Backing up the robot behavior have to call the turn behavior.

We considered these solutions, and were in favour of solution c.

Motivation Network:

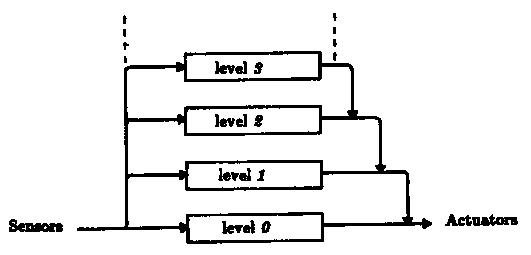
As suggested in the lab description we could return a float from 0 to 1 or an int from 0 to 1000 from takeControl, where the highest value is the highest motivation. How this motivation value should be calculated is different from each takeControl. In our case the arbitrator would function as the decision-maker, it should call all takeControl methods of the behaviour list, and run the behaviour with the highest motivation factor. To resolve conflicts of two behaviors having the same motivation factor, the priority that they are already listed in should determine which one is the most motivated.

Compared to Fig.1 the mapping functions and motivation variables would equal the takeControl method in the behaviour class. Behaviour patterns would equal the action method in the behaviour class. Decision-maker would equal the arbitrator.
We have not considered internal states and artificial genes.
Fig. 1 - Motivation network [Krink]

Conclusion:

In the lejos behaviour based architecture, it is important that the takeControl method is completed fairly quick, otherwise events may be missed. It is equally important that the action method can be suppressed without delay.
It is possible and fairly easy to implement a simple version of Motivation Networks by modifying the lejos behaviour based architecture.

References:

Krink:
Thiemo Krink (in prep.), Motivation Networks - A Biological Model for Autonomous Agent Control
(http://legolab.daimi.au.dk/DigitalControl.dir/Krink.pdf)

tirsdag den 16. november 2010

NXT Programming lesson 9


Date: 11. November 2010
Duration of activity: 12 - 17
Group members participating: Nikki & Knud


GOALS for lesson 9:

Our goal is to make the robot able to get back to its starting point, after some random movement.

Plan for achieving the goals:

We plan to achieve the “return to start” goal, by implementing navigation using the tacho counter on the motors combined with the wheel diameter and track width [Bagnall07]. We want to translate all movement into a x,y position with reference to the starting point 0,0, and thereby using a coordinate system as a map. This method of positioning is also called Dead Reckoning [Ridgesoft05]. We will try to implement the method proposed in [Ridgesoft05]. By having a x,y position of the robots current position, we should be able to get back to 0,0 (the starting point).

Dead reckoning positioning has some inherent disadvantages. If there is an insignificant error in the positioning measurement, it will accumulate over time/movement to a significant error, also called drifting. It is virtually impossible to avoid small errors in the measurements. The errors are introduced by small imprecision in the tacho-counter of the motors (as Bagnall notes in chapter 12 [Bagnall07]), wheel-slipping, etc. It is impossible to correct an accumulated error by only using self-centric measurements, we would need an external reference, like a GPS position, infrared receiver on the robot and transmitters placed strategically in the room it is navigating, etc.

An alternative to navigating by coordinates, is using a memory map of recognized landmarks [Mataric97]. We will not investigate this further, as we are constrained by time.


Results:

To test the accuracy of using the tacho for navigation, we used the TachoPilot class (http://lejos.sourceforge.net/nxt/pc/api/lejos/robotics/navigation/TachoPilot.html) in two simple programs, one that make the robot drive forward 1 meter,and one that makes it move in a square. We attached a marker to the robot, so we could measure the distance and turning angles.

With the first program, we measured the marked line to 97 cm where it should have been 100 cm, we assess this mainly to be because of the error in the tacho measurements of the motors.

With the program that was supposed to make the car draw a square we encountered that while the car was driving on whiteboard at first, it didn't make 90degree turns, but rather 20degrees turns. This was caused by excessive wheel slipping and wrong measure of the track width. The mounted marker lifted the wheels a little and as a result of that tracking of the wheel became worse on an already slippery surface. The incorrect track width measurement was due to confusion of how to measure the track width. The track width should be measured from the center width of the wheel, while our first measurements was from the inside and the outside of the wheels. After correcting the track width and adjusting the marker so less lifting occurred, it moved in a acceptable square.

The picture below shows the result of drawing a square, after the above errors were corrected


We found that dead reckoning positioning is already implemented in the lejos SimpleNavigator class (http://www.mathcs.org/robotics/nxt-java/lejos-api/lejos/robotics/navigation/SimpleNavigator.html)
Instead of writing our own implementation, we used the SimpleNavigator and ran some tests.

To test the accuracy of the dead reckoning positioning we placed a coin at the starting position of the robot and did the following:
  • Move forward for 2 seconds
  • Turn 90 degrees
  • Move forward for 2 seconds
  • Return to start position (0,0) and starting angle
  • Repeat 3 times

The following video show the robot complete the movement and how the small position errors accumulate, by comparing the end position of the robot to the reference starting position, the coin.


Conclusion:

The accuracy of dead reckoning by using the tacho count is very dependent on measuring the correct track width and wheel diameter. Furthermore it is also dependent on no wheel-slipping on the surface. It is virtually impossible to avoid accumulating errors, because of these factors and imprecision in the motor tacho counter.
We tried to minimize errors by using smaller wheels and a longer axle. In theory this should make it more precise, as an error in the tacho count has less impact as more rotations are required. This proved not to hold, probably because of the axle bending under the weight of the robot. A better robot design would make the axle more stable and should make it more accurate.

Source code:
http://www.liscom.dk/lego/Lab9Navigation/Navigation.java 
http://www.liscom.dk/lego/Lab9Navigation/Localizer.java 

References:

Bagnall07:
Brian Bagnall 2007, Maximum Lego NXT: Building Robots with Java Brains, Variant Press, ISBN-10 0973864915

Ridgesoft05:
Ridgesoft 2005, Enabling Your Robot to Keep Track of its Position
(http://www.ridgesoft.com/articles/trackingposition/TrackingPosition.pdf)

Mataric97:
Maja J Mataric Jun 1992 304-312, Integration of Representation Into Goal-Driven Behavior-Based Robots, in IEEE Transactions on Robotics and Automation (http://www-robotics.usc.edu/~maja/publications/ieeetra92.pdf) 


mandag den 8. november 2010

NXT Programming lesson 8

Lesson 8 description

Date: 4. November 2010

Duration of activity: 13 - 17

Group members participating: Nikki & Knud


GOALS for lesson 8

To implement several observable behaviors on the NXT controlling the 9797 LEGO car, with an ultrasonic sensor mounted.
The idea is to understand how to prioritize the different behaviors, and how they suppress each other.

Plan for achieving the goals:
The plan is to try SoundCar.java program as described in the lesson description with the 3 objects that each represent a single behavior. RandomDrive, AvoidFront and PlaySounds.

After this is done, we will try to add a behavior. The “drive towards light” or “Lightfinder”, as we called it, behavior.

Results:
We went back to lesson 7 and improved the light finder, with better sensors and better normalization. Our robot was now able to find its way out of a dark room and into the light through an open door.

The code that was given in the lesson 8 description was tested and confirmed that the behaviors implemented would also work as the prioritized order defined in the code which is:

rd = new RandomDrive("Drive",1, null);
af = new AvoidFront ("Avoid",2,rd);
ps = new PlaySounds ("Play ",3,af);

This means that the levels are in the order of:
level 0: RandomDrive
level 1: AvoidFront
level 2: PlaySounds
And in practice that meant that the robot would start of driving around randomly as programmed in the RandomDrive class then each 10 seconds it would play a weird tune as described in the playsounds class however if the robot encountered an obstacle in front of it then the it would stop and back a little though not while playing a tune since the playsounds behavior has the highest priority. And it was important to understand that each behavior would suppress all behaviors at lower levels, when the suppress() method call is made because the suppressCount is incremented so it would jump to the next level or the behavior with higher priority.

We then added a behavior, the “Lightfinder” behavior or substituted it with the randomdrive behavior so to speak, and we changed the order a little so the avoidfront behavior became highest priority.
We tested it in the kitchen room in the zuse building with the lights turned off but with the door still open and it was possible for it to find and drive through the door itself from a random spot in the dark kitchen room. Sometimes it would drive against obstacles, but occurrences of that was greatly reduced when the lightfinder behavior could be suppressed by the AvoidFront behavior at all times.

So the order was:
lf = new Lightfinder("Findlight ",4,null);
ps = new PlaySounds ("Play ",3,lf);
af = new AvoidFront ("Avoid ",2,ps);

Or in term of priority or levels:
level 0: Lightfinder
level 1: PlaySounds
level 2: AvoidFront

A picture of all the classes in the eclipse project can be seen here.

It is important as well to understand that all these classes are running concurrently. For example, the avoidfront behavior is constantly checking, with the ultrasonic sensor, whether the distance to obstacles in front of the robot is bigger than a predefined threshold, if its not then it would suppress the behaviors with lower priority and back the robot a little while and then make a turn to avoid the obstacle.

Video of improved LightFinder behavior:


Lightfinder code:
import lejos.nxt.*;

public class Lightfinder extends Behavior {

static int normalize(int light){
int MAX_LIGHT = 500;
int MIN_LIGHT = 140;
int output = 100 - ((light - MAX_LIGHT)*100)/(MIN_LIGHT - MAX_LIGHT);
if (output < output =" 0;"> 100)
{
output = 100;
}
return output;
}

public Lightfinder(String name, int LCDrow, Behavior subsumedBehavior) {
super(name, LCDrow, subsumedBehavior);
}
public void run()
{

LightSensor LeftLight = new LightSensor(SensorPort.S4);
LightSensor Rightlight = new LightSensor(SensorPort.S1);

Rightlight.setFloodlight(false);
LeftLight.setFloodlight(false);

//power for disco lights on top of vehicle
MotorPort.A.controlMotor(100, 1);

while (true){
suppress();

int normright = normalize(Rightlight.getNormalizedLightValue());
int normleft = normalize(LeftLight.getNormalizedLightValue());
int leftinh = normleft;
int rightinh = normright;

forward((normright+40)-(leftinh-40),(normleft+40)-(rightinh-40));

release();

}
}
}

onsdag den 3. november 2010

NXT Programming lesson 7

Date: 3. November 2010
Duration of activity: 12.15 -15.00
Group members participating: Nikki & Knud


GOALS for lesson 7
To use the NXT to build and program Braitenberg vehicles as e.g. 1, 2a and 2b, Figure 1.

The concept of the braitenberg’s vehicles is a simple sort of wheeled robot with mounted sensors that sensitive to different stimuli. The sensors are wired directly to the motors that drives the wheel of the robot. It is assumed that the sensors generates a signal that is proportional to the stimulus. A simple example is the light sensor, if it reaches maximum light intensity then motors go full throttle, and if its completely dark the motors don’t run at all.

Eventual sub goals:
1:
Use Tom Dean's notes, [2,3], to understand the three vehicles and use his notes to implement the three vehicles. As sensors you might use e.g. a sound sensor in vehicle 1 to implement a vehicle that moves faster the louder the environment sound is. In the two other vehicles use e.g. light sensors. Is it possible to use two sound sensors in the vehicles 2a and 2b ?
2:
In the vehicles of Figure 1 all connections are marked with a +. This means the more of the measured quantity, e.g. light, the more motor power. Braitenberg also use connections marked with a - to mean an inhibition connection, the more the less. Implement this kind of connection and investigate the behaviour e.g. with two inhibition connections in vehicle 2b.
3:
Put a lamp on top of your vehicle with two light sensors and try to see what happens when several vehicles are put close together e.g. on a floor.
4:
In Tom Deans notes there is a single thread of control in which the two light sensors are sampled and the two power values are put out to the motors. Try to implement the vehicles with two threads of control, one thread for each connection.
5:
In Tom Deans description the variables MAX_LIGHT and MIN_LIGHT are updated over all the sample values obtained during the lifetime of the vehicle. If the vehicle is existing for a long time under different light conditions we might only want to collect these values over the last N samples. Make changes to your program so that this is possible.

Plan for building the robots:
Vehicle 1:
An idea might be to use a sound sensor on vehicle to implement a vehicle that moves faster the louder the environment sound is. A light sensor could also be used to make the vehicle drive faster depending on the light intensity.
Vehicle 2:
Could be made with 2 lightsensors or 2 sound sensor,
Vehicle 3:
Could be made 4 lightsensors, will make sharper turns because the light intensity on opposite motor.

Results:
The sensors do not seem to be completely linear with light intensity. Also the sensor output does not change much unless a flashlight is pointing directly in the sensor. This could be a issue with the dynamic range of the sensor. The robot cant really respond to differences in ambient light.

Vehicles 2a and 2b and 3 was made.
The big difference between vehicle 2 and 3 is that vehicle 3 will make bigger turns.
Picture of vehicle 3:


Code for vehicle 3:
while (!Button.ESCAPE.isPressed()){
           int left = leftLight.getLightValue();
           int right = rightLight.getLightValue();
           int L_Inhibitor = leftInhibitor.getLightValue();
           int R_Inhibitor = RightInhibitor.getLightValue();           

           Car.forward((right+40)-(L_Inhibitor-40), (left+40)-(R_Inhibitor-40));    
        
       } 
 
Source code:
http://www.liscom.dk/lego/Lab7Braitenberg/Braitenberg.java 
http://www.liscom.dk/lego/Lab7Braitenberg/Car.java